8.9 KiB
sqld User Guide
Welcome to the sqld user guide!
Table of Contents
Overview
The sqld program provides libsql over HTTP and supports transparent replication.
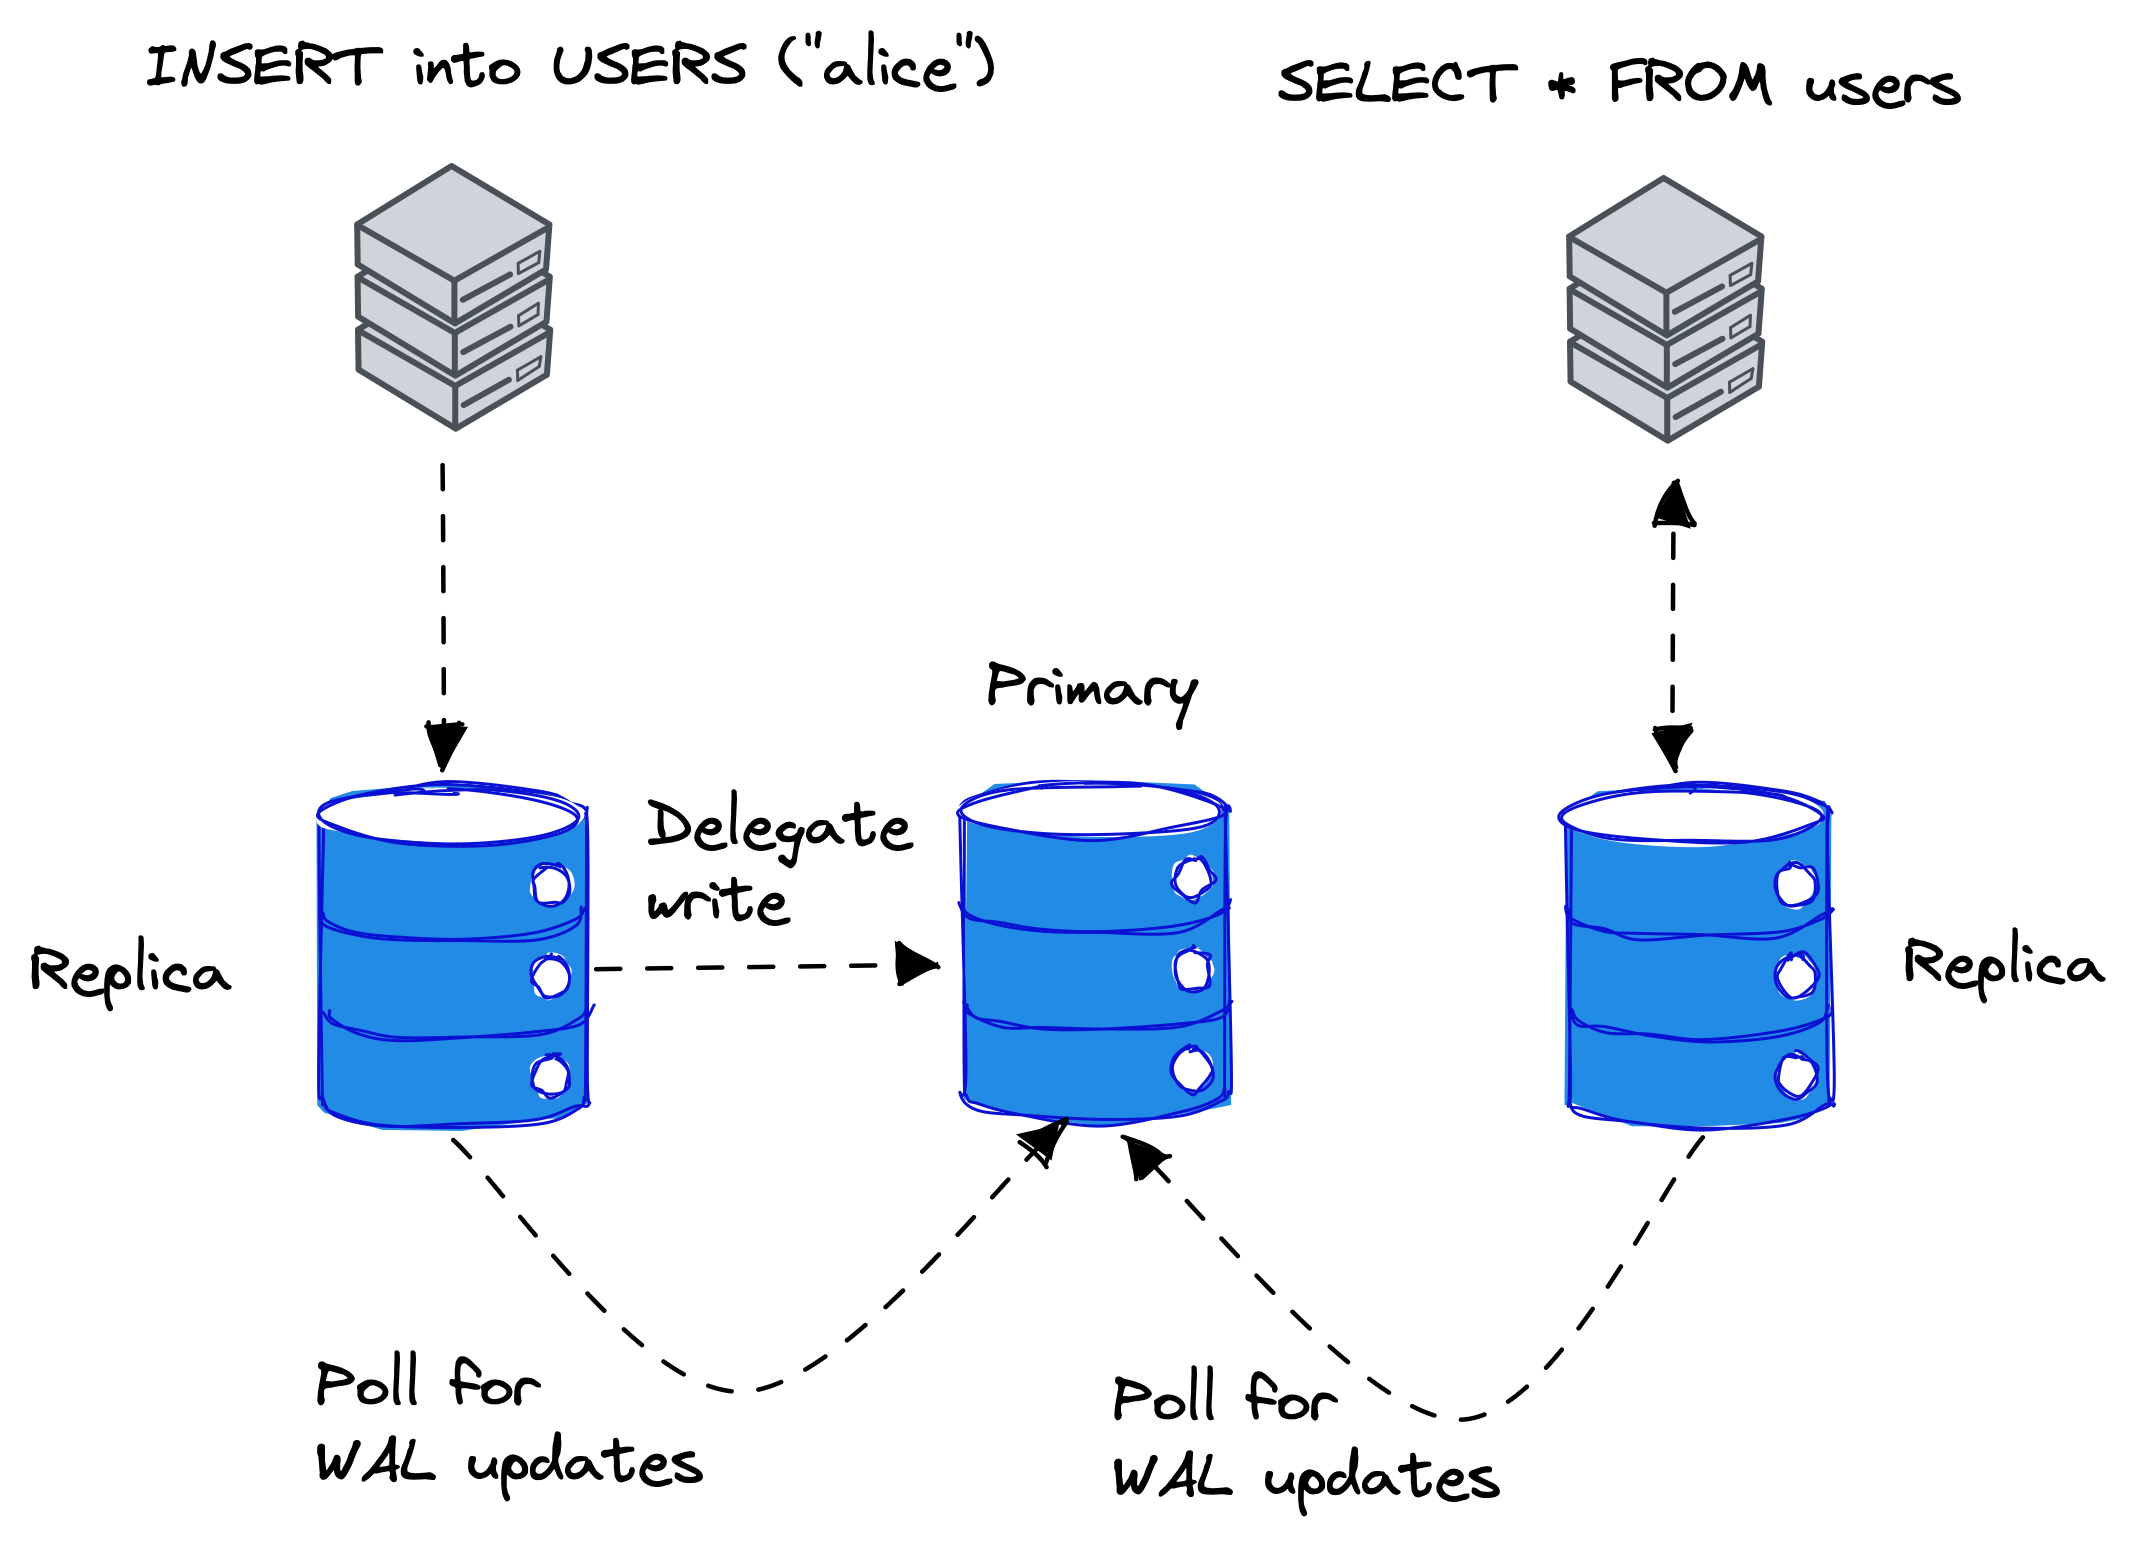
Figure 1. Overview of libsql clustering.
Figure 1 shows an overview of libsql cluster where clients execute SQL remotely over HTTP against sqld instances.
In the middle, there is the primary instance, which is responsible for accepting writes and servicing replicas for write-ahead log (WAL) updates.
If a client performs a write operation such as INSERT statement in SQL, replicas delegate the write to a primary node.
Read operations, such as SELECT statements, however, are executed on the replica directly.
The replicas poll the primary instance for WAL updates periodically over a gRPC connection.
Replication
In this section, we will walk you through how to set up a libsql cluster.
TLS configuration
The nodes in a sqld cluster communicate over gRPC with TLS. To set up a sqld cluster, you need the following TLS configuration:
- Certificate authority (CA) certificate and private key
- Primary server certificate and private key
- Replica server certificates and private keys
In TLS speak, the primary server is the server and the replica servers are the clients.
For development and testing purposes, you can generate TLS keys and certificates with:
python scripts/gen_certs.py
The script generates the following files:
ca_cert.pem-- certificate authority certificateca_key.pem-- certificate authority private keyserver_cert.pem-- primary server certificateserver_key.pem-- primary server private keyclient_cert.pem-- replica server certificateclient_key.pem-- replica server private key
Launching a primary server
To start a sqld server in primary mode, run:
sqld \
  --http-listen-addr 127.0.0.1:8081 \
  --grpc-listen-addr 127.0.0.1:5001 \
  --grpc-tls \
  --grpc-ca-cert-file ca_cert.pem \
  --grpc-cert-file server_cert.pem \
  --grpc-key-file server_key.pem
You now have a sqld primary server listening to SQL over HTTP at 127.0.0.1:8081 and gRPC with TLS at 127.0.0.1:5001.
Launching a replica server
To start a a sqld server in replica mode, run:
sqld \
  --http-listen-addr 127.0.0.1:8082 \
  --primary-grpc-url https://127.0.0.1:5001 \
  --primary-grpc-tls \
  --primary-grpc-ca-cert-file ca_cert.pem \
  --primary-grpc-cert-file client_cert.pem \
  --primary-grpc-key-file client_key.pem
You now have a sqld replica server listening to SQL over HTTP at 127.0.0.1:8082, which is connected to a primary server at 127.0.0.1:5001.
You can add more replicas to the cluster by just starting more sqld processes. However, it's recommended that you generate a different TLS configuration for every replica.
To test the cluster, you can, for example, create a table and insert rows in the replica:
curl -d '{"statements": ["CREATE TABLE IF NOT EXISTS users (username)", "INSERT INTO users VALUES (\"alice\")"]}' 127.0.0.1:8082
and query the results from the primary:
curl -d '{"statements": ["SELECT * FROM users"]}' 127.0.0.1:8081
Client Authentication
You can configure client authentication by passing the --auth-jwt-key-file FILENAME command line option to sqld.
The key is either a PKCS#8-encoded Ed25519 public key in PEM, or just plain bytes of the Ed25519 public key in URL-safe base64.
Deployment
Deploying with Docker
You can pull the official Docker image for sqld with
docker pull ghcr.io/libsql/sqld:main
You can find more information about the Docker image here.
Deploying on Fly
You can use the existing fly.toml file from this repository.
Just run
flyctl launch
... then pick a name and respond "Yes" when the prompt asks you to deploy.
You now have sqld running on Fly listening for HTTP connections.
Give it a try with this snippet, replacing $YOUR_APP with your app name:
curl -X POST -d '{"statements": ["create table testme(a,b,c)"]}' $YOUR_APP.fly.dev
curl -X POST -d '{"statements": ["insert into testme values(1,2,3)"]}' $YOUR_APP.fly.dev
curl -X POST -d '{"statements": ["select * from testme"]}' $YOUR_APP.fly.dev
[{"b":2,"a":1,"c":3}]
Incremental snapshots
The sqld generates incremental snapshots of the database file, which you can apply to a local libSQL replica.
For example, suppose you have an application that is not always connected over the network and can't rely on the sqld gRPC replication method. In that case, you can configure sqld to notify of generated incremental snapshots, sync the snapshot files to another machine, and apply them.
You can use the --snapshot-exec command line option to specify a file, such as a shell script, to execute on snapshot generation. You can also use the --max-log-duration SECS command line option
on to control how often sqld generates the snapshot files to ensure the freshness of the data on local replicas.
To use incremental snapshots, first, create a shell script with the name snapshot.sh:
#!/bin/bash

SNAPSHOT_FILE="$1"
NAMESPACE="$2"

echo "Generated incremental snapshot $SNAPSHOT_FILE for namespace $NAMESPACE"
and then configure sqld to generate an incremental snapshot every 5 seconds and invoke the shell script when sqld generates a snapshot:
sqld --snapshot-exec ./snapshot.sh --max-log-duration 5
When you write to the sqld database, you will eventually see log line such as:
2023-08-11T08:21:04.183564Z  INFO sqld::replication::snapshot: snapshot `e126f594-90f4-45be-9350-bc8a01160de9-0-2.snap` successfully created
Generated incremental snapshot data.sqld/dbs/default/snapshots/e126f594-90f4-45be-9350-bc8a01160de9-0-2.snap
The first line is logging from sqld and the second line is sqld executing snapshot.sh script.
You can now, for example, rsync the snapshot file to another machine, to apply the changes to a local replica with the Database::sync_frames() method of the libsql crate:
use libsql::Database;
use libsql_replication::{Frames, TempSnapshot};

#[tokio::main]
async fn main() {
    tracing_subscriber::fmt::init();

    let opts = libsql::Opts::with_sync();
    let db = Database::open_with_opts("test.db", opts).await.unwrap();
    let conn = db.connect().unwrap();

    let args = std::env::args().collect::<Vec<String>>();
    if args.len() < 2 {
        println!("Usage: {} <snapshot path>", args[0]);
        return;
    }
    let snapshot_path = args.get(1).unwrap();
    let snapshot = TempSnapshot::from_snapshot_file(snapshot_path.as_ref()).unwrap();

    db.sync_frames(Frames::Snapshot(snapshot)).unwrap();

    let rows = conn
        .query("SELECT * FROM sqlite_master", ())
        .unwrap()
        .unwrap();
    while let Ok(Some(row)) = rows.next() {
        println!(
            "| {:024} | {:024} | {:024} | {:024} |",
            row.get::<&str>(0).unwrap(),
            row.get::<&str>(1).unwrap(),
            row.get::<&str>(2).unwrap(),
            row.get::<&str>(3).unwrap(),
        );
    }
}
Multitenancy
The sqld server supports more than one database. To create a database, send a create namespace request to the admin API.
For example, to create a database named db1, send the following HTTP request:
curl -X POST http://localhost:8080/v1/namespaces/db1/create
The name of the database is determined from the Host header in the HTTP request.
For example, if you have the following entries in your /etc/hosts file:
127.0.0.1       db1.local
127.0.0.1       db2.local
You can access db1 with the http://db1.local:8080URL and db2 with http://db2.local:8080.
The database files for the databases are stored in <data dir>/dbs/db1 and <data dir/dbs/db2, respectively.
Path based routing
For local development and testing, you can also connect to your databases by specifying the database namespace in the URL path.
You can access namespace db1 with the http://local:8080/dev/db1 URL and db2 with http://local:8080/dev/db2, respectively.
Wildcard domain for development
If you don't feel like editing /etc/hosts each time you want to test a new namespace, you can use any domain
that returns 127.0.0.1 for all subdomains. One of such domains is *.db.sarna.dev, which you can use to access
your local db1 and db2 as http://db1.db.sarna.dev and http://db2.db.sarna.dev respectively.