Reverse Engineering Serial Ports
- By Craig | November 1, 2012 | Embedded Systems, Hardware, Tutorials
- Edited by Matheus S Queiroga
Introduction
Serial ports are extremely useful to embedded developers, who commonly use them for:
Accessing the boot loaderObserving boot and debug messagesInteracting with the system via a shell
Needless to say, this functionality is also useful to hackers, so finding a serial port on an embedded device can be very advantageous. As a case study, we'll be examining the PCB of a Westell 9100EM FiOS router for possible serial ports:
Now, these aren't your dad's RS-232 serial ports that we're looking for; these are Universal Asynchronous Receiver Transmitters (UARTs), commonly found in embedded devices. Although protocol compatible, RS-232 and UART are not voltage compatible (from here on out I will use the terms “UART” and “serial port” interchangeably). UARTs most commonly operate at 3.3 volts, but can also be found operating at other standard voltages (5, 1.8, etc).
Unfortunately there aren't any industry standardized UART pin outs, and manufacturers don't often go around advertising or documenting their debug interfaces, so we'll need to do a bit of work in order to interface with these serial ports. Specifically, we need to reverse engineer both the hardware interface and the software protocol settings.
Let's start with the hardware interface first. For this, you'll need a multimeter and a pair of eyeballs (or even one will do just fine). Yes, oscilloscopes and logic analyzers are useful and sometimes necessary, but 99% of the time a trusty multimeter and a bit of knowledge is all you need.
Identifying Serial Headers
The first step is to try to identify potential candidates for serial port headers. Most serial port headers have at a minimum four pins:
VccGroundTransmitReceive
Typically you'll want to look for a single row of 4-6 pins, although this is not a hard and fast rule and they can come in any pin configuration the manufacturer has decided on.
On our 9100EM PCB we find two possible candidates, labeled P1402 and P1404:
Sometimes you won't have a nicely broken out set of pins like this, and you'll have to examine test points on the board; usually starting with test points closest to the SoC is a good idea. Here is an example of a serial port exposed via test points on a different board, the WL530G:
In either case the process of pin identification is the same, but usually takes longer if there is no header since there will likely be more than 4 test points on the board that you will need to examine.
At this point either P1402 or P1404 could be serial port headers. Or they could both be serial port headers. Or neither could be a serial port header. So we'll examine the pins on each header individually to try to gain some insight.
Visual Inspection
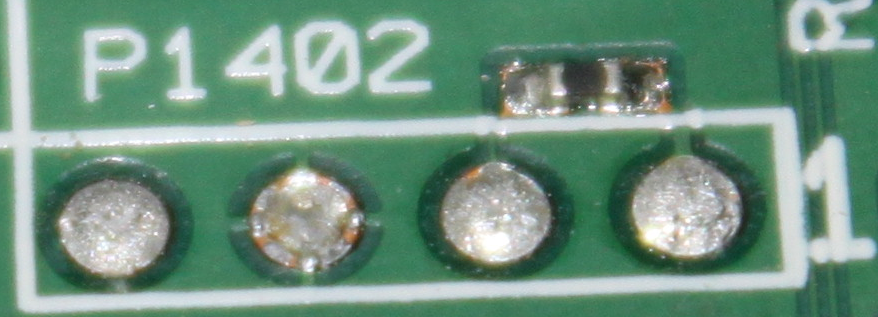
First, let's visibly inspect the pins. We'll start by taking a look at P1402:
On the top layer of the PCB the right most pin is labeled as pin “1”. This is not terribly important, but it gives a common frame of reference when describing the pin numbers.
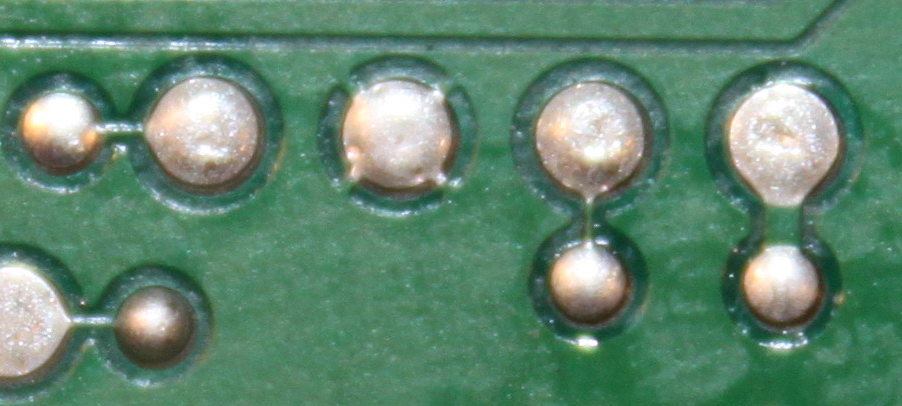
On the bottom of the PCB we see that pin 3 has four traces in a crosshair pattern that connect it to the surrounding ground plane. This easily identifies pin 3 as ground.
Pins 2 and 4 have thin traces connected to them, while pin 1 is connected to a fatter trace. Wide traces are typically used for supplying power, while narrow traces are usually used for signal traces. This suggests that pin 1 is Vcc and pins 2 and 4 are potentially transmit and receive (although we don't yet know which is which).
Let's take a look at the P1404 header now:
Here, the left most pin is marked as pin 1. Again, we see that pin 3 is connected to ground on the bottom layer of the PCB. Pin 4 also has a thin trace connected to it, so it could be a transmit or receive pin.
The other two pins of P1404 however have no visible traces connected to them on either the top or bottom layers of the PCB. It could be that they aren't connected to anything, but more likely their traces are connected on one of the inner layers of the PCB that we can't see. Time to break out the multimeter.
Identifying Grounded Pins
A continuity test introduces a small current into the circuit; if enough current passes from one probe to the other (i.e., there is sufficiently little resistance), the multimeter will emit an audible tone indicating that the points that the probes are touching are electrically connected.
The first thing we want to do is perform a continuity test between ground and all the pins on each of the headers using the multimeter. This will tell us which pins are connected directly to ground. We'll start with P1402.
Metal shielding is a convenient ground point to use for testing. Placing one probe on a shield and touching the other to pin 3, the multimeter emits a continuous audible tone, indicating that pin 3 is connected to ground as we previously observed:
Performing the same test against pins 2 and 4 results in no audible tone, so we know those pins aren't grounded.
The same continuity tests for P1404's pins 2, 3 and 4 produce the same results. Thus we know that for both P1402 and P1404 pin 3 is grounded and pins 2 and 4 are not.


